아래 이분께서 넘 정리 잘 하셔 놓음...
http://lomohome.com/321
혹시 링크 날아갈까봐 그대로 복사해놓음..
- 개인적인용도로 요약한 글이라 글에서는 경어체를 사용하지 않습니다. 글 읽으시는데 참고부탁드립니다.
- Mac의 Pages 로 작성한 후 블로그에 포스팅하려니 서식이 다 깨졌네요.
PDF 파일로 보는것이 보기 좋습니다.
저번엔 안드로이드용 위치기반 지점찾기 (LBS)를 구현하였고, 이번에 아이폰용 뱅킹어플을 만들면서 아이폰용도 지점찾기를 어플로 구현할 필요가 생겼다.
이번엔 계속 써와서 익숙한 Java 가 아니라 Objective C 여서 시작하기가 막막했다. 배우면서, 삽질하며 완성시킨거라 버그도 있을것이고 여러부분에서 미숙한 점이 있을테지만 마찬가지로 까먹지 않기 위하여 정리를 해둔다.
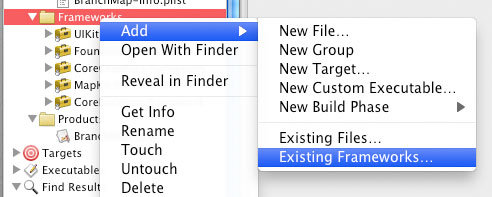
1. 프로젝트에 프레임웍 추가하기.
프로젝트의 프레임웍에서 마우스 오른쪽버튼 (또는 옵션클릭)을 하여 프레임웍을 추가해준다.
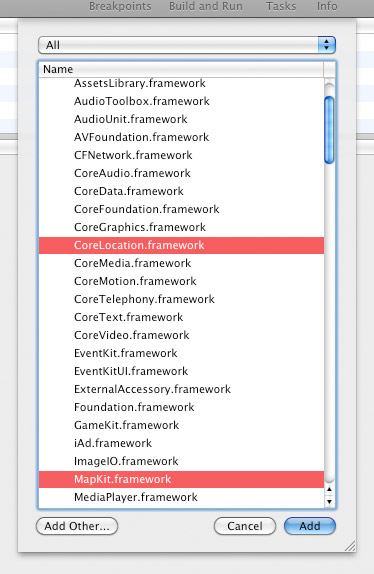
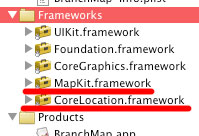
사용자 위치정보를 가져올 CoreLocation.framework 와 지도표시에 필요한 MapKit.framework 을 추가해준다.
추가가 된것을 확인하면 성공.
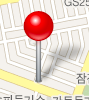
2. 뷰에서 사용할 마커(어노테이션) 준비하기.
지도 앱들을 보면 다음과 같은 핀이 있는데 이것이 안드로이드에서는 마커, iOS에서는 어노테이션이라고 불리우는 드랍핀이다.
그냥 써도 되지만 지점찾기 앱에서는 각 마커마다 지점의 정보를 가지고 있기
때문에 MKAnnotation 을 구현하여 커스텀 어노테이션을 만들어 쓰기로 했다.
// BranchMarker.h
// 마커(어노테이션)에 쓰일 객체.
#import <Foundation/Foundation.h>
#import <MapKit/MKAnnotation.h>
@interface BranchMarker : NSObject <MKAnnotation>{
//요거 세개는 어노테이션에 필수로 구현해줘야 동작한다.
CLLocationCoordinate2D coordinate;
NSString *title;
NSString *subtitle;
//요 아래는 추가로 필요해서 변수 준비.
NSString *bussBrNm; //영업점명
NSString *bussBrTelNo; //영업점 전화번호
NSString *bussBrAdr; //영업점주소 (찾아오시는길)
NSString *trscDrtm; //거래시간
NSString *bussBrAdr2; //영업점주소 (주소)
NSString *markerType; //마커 타입 (0:지점, 1:ATM)
}
@property (nonatomic,assign) CLLocationCoordinate2D coordinate;
@property (nonatomic,copy) NSString *title;
@property (nonatomic,copy) NSString *subtitle;
@property (nonatomic,retain) NSString *bussBrNm;
@property (nonatomic,retain) NSString *bussBrTelNo;
@property (nonatomic,retain) NSString *bussBrAdr;
@property (nonatomic,retain) NSString *trscDrtm;
@property (nonatomic,retain) NSString *bussBrAdr2;
@property (nonatomic,retain) NSString *markerType;
@end
헤더에서는 coordinate, title, subtitle 을 필수로 구현해줘야 MKAnnotation 이 멀쩡히 돌아간다.
// BranchMarker.m
#import "BranchMarker.h"
@implementation BranchMarker
@synthesize coordinate, title, subtitle;
@synthesize bussBrNm,bussBrTelNo,bussBrAdr,trscDrtm,bussBrAdr2,markerType;
-(void) dealloc{
[title release];
[subtitle release];
[super dealloc];
}
@end
구현파일에서는 특별히 구현할것이 없고 synthesize 만 충실히 해주도록 한다.
3. 뷰컨트롤러 준비하기.
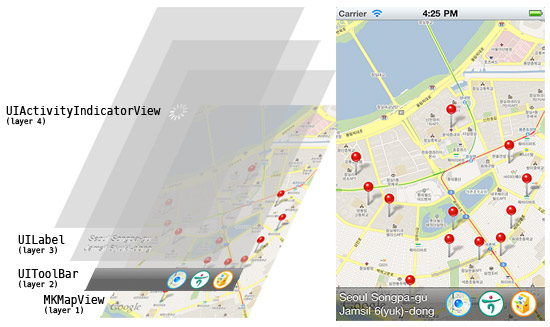
이제 실제 지도를 구현해본다. 이번 어플에서는 크게 다음과 같이 네개의 뷰가 겹쳐져 있다.
맨 아래에 지도를 표시하는 MKMapView 가 깔리고 그 위로 서브뷰로 아이콘 버튼들이 있는 툴바,
그리고 툴바위에 역 지오코딩 (위도, 경도를 가지고 주소를 추적해내는 기술) 한 스트링이 UILabel 로 뿌려지고, 마지막으로 그 위에 어플이 로딩상태일때 로딩을 표시할 스피너가 올려져있다.
// BranchMapViewController.h
// 지점찾기 뷰 컨트롤러.
#import <UIKit/UIKit.h>
#import <MapKit/MapKit.h>
#import <CoreLocation/CoreLocation.h>
//위치관리자, 맵뷰, 그리고 리버스 지오코더 딜리게이트를 구현한다.
@interface BranchMapViewController : UIViewController <CLLocationManagerDelegate , MKMapViewDelegate, MKReverseGeocoderDelegate>{
NSString *searchType; //지점,ATM의 검색 타입
MKMapView *mapView; //지도
//위,경도를 가지고 해당위치의 주소를 가지고 오는 리버스지오코더
MKReverseGeocoder *reverseGeocoder;
//위지관리자. GPS,wifi 등으로 현재 기기의 위치를 가져온다.
CLLocationManager *locationManager;
CLLocation *lastScannedLocation; //마지막으로 검색된 위치를 저장할 객체.
UIActivityIndicatorView * spinner; //화면의 로딩 스피너.
UILabel *geoLabel; //툴바에 리버스지오코더의 결과를 표시한다.
}
@property (retain, nonatomic) NSString *searchType;
@property (retain, nonatomic) MKMapView *mapView;
@property (nonatomic, retain) MKReverseGeocoder *reverseGeocoder;
@property (nonatomic, retain) CLLocationManager *locationManager;
@property (nonatomic, retain) CLLocation *lastScannedLocation;
@property (nonatomic, retain) UIActivityIndicatorView * spinner;
@property (nonatomic, retain) UILabel *geoLabel;
//뷰컨트롤러를 만들때 검색타입을 지정한다. BRANCH/ATM
- (id)initWithShowType:(NSString *)showType;
//지점정보를 HTTP통신으로 가지고 온다.- (void)getBranchDataWithLocation:(CLLocation *)location;
@end
메인 구현파일이라 엄청길다.
// BranchMapViewController.m
#import "BranchMapViewController.h"
#import <MapKit/MapKit.h>
#import <CoreLocation/CoreLocation.h>
#import "BranchMarker.h"
#import "BranchMapGetDataAction.h"
@implementation BranchMapViewController
@synthesize searchType;
@synthesize mapView,reverseGeocoder,geoLabel;
@synthesize locationManager;
@synthesize lastScannedLocation;
@synthesize spinner;
- (id)initWithShowType:(NSString *)showType {
if ((self = [super init])) {
// Custom initialization
self.searchType = showType;
}
NSLog(@"initWithShow %@",self.searchType);
return self;
}
//이미지로 된 커스텀 뷰를 만들어준다.
//_normalImg : 버튼 이미지, _touchImg : 눌럿을때 바뀔 이미지, _width : 이미지버튼의 가로길이, _height : 이미지버튼의 세로길이 , _sel : 버튼눌렀을때 할 액션
-(UIButton*) createCustomImageButtonWithNormalImgNm:(NSString*)_normalImg
andTouchImg:(NSString*)_touchImg andWidth:(float)_width
andHeight:(float)_height andSEL:(SEL)_sel{
// 버튼 배경에 사용할 이미지 준비.
UIImage *normalImage = [UIImage imageNamed:_normalImg];
UIImage *touchImage = [UIImage imageNamed:_touchImg];
// 버튼 생성
//x,y,width,height
CGRect buttonRect = CGRectMake(0.0f, 0.0f, _width, _height);
UIButton *button = [[[UIButton alloc]
initWithFrame:buttonRect] autorelease];
// 버튼의 배경 이미지 설정
[button setBackgroundImage:normalImage forState:UIControlStateNormal];
[button setBackgroundImage:touchImageforState:UIControlStateHighlighted];
// 버튼에 액션 설정
[button addTarget:self action:_sel
forControlEvents:UIControlEventTouchUpInside];
return button;
}
- (void)viewDidLoad {
[super viewDidLoad];
//searchType 이 널탕이 들어오면 기본적으로 지점 검색으로 한다.
if (self.searchType == nil) self.searchType = @"BRANCH";
//위치 관리자를 초기화한다.
self.locationManager = [[[CLLocationManager alloc] init]autorelease];
//딜리게이트는 self로 설정후 하단에서 딜리게이트 구현.
self.locationManager.delegate = self;
//측정방법은 가장 좋게.
self.locationManager.desiredAccuracy = kCLLocationAccuracyBest;
//2000m 이상 위치가 변경되면 노티를 줌.
self.locationManager.distanceFilter = 2000.0f;
[self.locationManager startUpdatingLocation]; //현재위치 가져오기 시작~
//지도 뷰를 만든다.
//뷰의 크기만큼 지도를 채운다.
mapView = [[MKMapView alloc] initWithFrame:self.view.bounds];
mapView.showsUserLocation = YES; //내 위치 표시.
[mapView setMapType:MKMapTypeStandard]; //지도 형태는 기본.
[mapView setZoomEnabled:YES]; //줌가능
[mapView setScrollEnabled:YES]; //스크롤가능
mapView.delegate = self; //딜리게이트 설정 (anotation 의 메소드를 구현한다.)
MKCoordinateRegion region;
MKCoordinateSpan span; //보여줄 지도가 처리하는 넓이 정의.
span.latitudeDelta = 0.02; //숫자가 적으면 좁은영역 까지 보임.
span.longitudeDelta = 0.02;
CLLocationCoordinate2D location = mapView.userLocation.coordinate;
//위치정보를 못가져왔을때 기본으로 보여줄 위치.
location.latitude = 37.566275; //37.490481 이건 우리집
location.longitude = 126.981794; //126.857790
region.span = span; //크기 설정.
region.center = location; //위치 설정.
[mapView setRegion:region animated:TRUE]; //지도 뷰에 지역 설정.
[mapView regionThatFits:region]; //지도 화면에 맞게 크기 조정.
[self.view addSubview:mapView]; //서브 뷰로 지도를 추가함.
//하단에 버튼들 toolbar 추가
//현재 뷰의 크기를 가져와서 상단 바의 길이가 조정되면 하단 바가 잘리는것을 방지하기 위함.
float heightPos = self.view.bounds.size.height;
UIToolbar *toolbar = [[UIToolbar alloc]
initWithFrame:CGRectMake(0.0, heightPos - 50.0f , 320.0, 50.0)]; toolbar.barStyle = UIBarStyleBlackTranslucent; //툴바스타일은 까만 투명색
//빈 영역 잡아주는 버튼아이템. 왼쪽에 빈 영역 두고, 오른쪽으로 버튼들을 배치하기위함.
UIBarButtonItem *flexibleSpace = [[UIBarButtonItem alloc]
initWithBarButtonSystemItem:UIBarButtonSystemItemFlexibleSpace
target:nil action:nil];
//이미지 커스텀 버튼.
UIBarButtonItem *hereBtn = [[UIBarButtonItem alloc]
initWithCustomView:[selfcreateCustomImageButtonWithNormalImgNm:@"here.png"
andTouchImg:@"here_pressed.png" andWidth:40.0f andHeight:40.0f
andSEL:@selector(setSearchTypeToHere)]]; //현위치
UIBarButtonItem *branchBtn = [[UIBarButtonItem alloc]
initWithCustomView:[selfcreateCustomImageButtonWithNormalImgNm:@"atm_btn.png"
andTouchImg:@"atm_btn_pressed.png" andWidth:40.0f andHeight:40.0f
andSEL:@selector(setSearchTypeToATM)]]; //ATM검색
UIBarButtonItem *atmBtn = [[UIBarButtonItem alloc]
initWithCustomView:[selfcreateCustomImageButtonWithNormalImgNm:@"hana_btn.png"
andTouchImg:@"hana_btn_pressed.png" andWidth:40.0f andHeight:40.0f
andSEL:@selector(setSearchTypeToBranch)]]; //지점검색
//툴바 아이템 배치
toolbar.items = [NSArray
arrayWithObjects:flexibleSpace,hereBtn,atmBtn,branchBtn,nil];
//툴바를 뷰에 추가.
[self.view addSubview:toolbar];
//툴바에 쓰인 버튼들 릴리즈.
[flexibleSpace release];
[hereBtn release];
[branchBtn release];
[atmBtn release];
[toolbar release];
//화면스피너 셋팅. 로딩중을 표시하기 위함.
self.spinner = [[UIActivityIndicatorView alloc]
initWithActivityIndicatorStyle:UIActivityIndicatorViewStyleWhiteLarge];
//화면중간에 위치하기위한 포인트.
[self.spinner setCenter:CGPointMake(320.0f/2.0, 480.0f/2.0)];
[self.view addSubview:spinner]; //스피너를 뷰에 추가하고 필요시에 start
//geoCoder 라벨 셋팅. '서울시 송파구 신천동' 따위를 툴바에 표시한다.
geoLabel = [[UILabel alloc]
initWithFrame:CGRectMake(5.0, heightPos - 45.0f, 160.0,40.0)];
geoLabel.backgroundColor = [UIColor clearColor];
geoLabel.highlighted = YES;
geoLabel.highlightedTextColor = [UIColor whiteColor];
geoLabel.shadowColor = [UIColor blackColor];
geoLabel.textColor = [UIColor whiteColor];
geoLabel.textAlignment = UITextAlignmentLeft;
geoLabel.numberOfLines = 2; //두줄 표시 가능.
[self.view addSubview:geoLabel]; //뷰에 라벨 추가.
//초기 환영 메세지.
UIAlertView *alert = [[UIAlertView alloc]initWithTitle:@"위치기반 지점찾기" message:@"위치정보를 가져오는데 기기,통신상태에 따라 시간이 걸릴수 있으며 일부동작하지 않는 기기도 있습니다.\n\n하단의 아이콘을 이용하여 현재 지도가 표시하고 있는 지역을 중심으로 지점/ATM을 검색하실 수 있습니다." delegate:nil cancelButtonTitle:nil
otherButtonTitles:@"확인",nil];
[alert show];
[alert release];
}
//검색 타입 ATM으로 셋팅.
-(void)setSearchTypeToATM{
//현재 지도가 위치하는곳을 중심으로.
CLLocation *customLocation = [[CLLocation alloc]
initWithLatitude:mapView.centerCoordinate.latitude
longitude:mapView.centerCoordinate.longitude];
self.searchType = @"ATM";
[self getBranchDataWithLocation:customLocation]; //HTTP 통신
[customLocation release];
}
//검색 타입 지점으로 셋팅.
-(void)setSearchTypeToBranch{
//현재 지도가 위치하는곳을 중심으로.
CLLocation *customLocation = [[CLLocation alloc]
initWithLatitude:mapView.centerCoordinate.latitude
longitude:mapView.centerCoordinate.longitude];
self.searchType = @"BRANCH";
[self getBranchDataWithLocation:customLocation]; //HTTP 통신
[customLocation release];
}
//현위치
-(void)setSearchTypeToHere{
[self.locationManager startUpdatingLocation]; //로케이션 메니저 다시시작~
}
//문자열 치환 메소드. source : 원본, 찾을문자열, 바꿀문자열.
-(NSString*)replaceStrSource:(NSString*)sourceStr
strFrom:(NSString*)_from strTo:(NSString*)_to{
NSMutableString *mstr = [NSMutableStringstringWithString:sourceStr];
NSRange substr = [mstr rangeOfString: _from];
while (substr.location != NSNotFound) {
[mstr replaceCharactersInRange: substr withString:_to];
substr = [mstr rangeOfString: _from];
}
return mstr;
}
//지도 데이터를 HTTP통신을 통해 받아와서 표시해준다.
- (void)getBranchDataWithLocation:(CLLocation *)location{
NSLog(@"getBranchDataWithLatitude:%f andLongitude:%f",
location.coordinate.latitude,location.coordinate.longitude);
//화면에 로딩스피너 스타트.
[self.spinner startAnimating];
//HTTP통신에 ContentProvide server와 규격을 맞추기 위해, 위도,경도에서 콤마(.)를 제거해서 보내야한다.
NSString *lat = [self replaceStrSource:
[NSStringstringWithFormat:@"%f",location.coordinate.latitude]
strFrom:@"."strTo:@""];
NSString *lng = [self replaceStrSource:
[NSStringstringWithFormat:@"%f",location.coordinate.longitude]
strFrom:@"."strTo:@""];
NSString *range = @"3000"; //기본 3Km반경 지점을 검색해 오게 만든다.
NSString *sType = @"0";
//ATM = 1, 지점 = 0
if ([self.searchType isEqualToString:@"ATM"]) sType = @"1";
else sType = @"0";
//HTTP통신으로 지점정보 가져오는 액션 초기화.
BranchMapGetDataAction *getAction = [[BranchMapGetDataActionalloc]
initWithSearchType:sType andReqLat:lat andReqLng:lngandReqRange:range];
//HTTP통신으로 지점정보를 가져온다.
NSMutableArray *branchMarkerAry = [getAction getData];
//마커를 새로 찍기전에 기존에 지도에 있던 마커(annotation)를 전부 지운다.
NSMutableArray *toRemove = [NSMutableArray arrayWithCapacity:1];
for(id annotation in mapView.annotations){
if (annotation != mapView.userLocation){
[toRemove addObject:annotation];
}
}
NSLog(@"remove %d annotations.",[toRemove count]);
[mapView removeAnnotations:toRemove];
//받아온 마커(annotation)를 맵에 찍어낸다.
NSLog(@"branch marker count : %d",[branchMarkerAry count]);
if([branchMarkerAry count] > 0){
for (BranchMarker* marker in branchMarkerAry){
if (marker != nil) [mapView addAnnotation:marker];
}
}
//reverseGeocoding 시작.
self.reverseGeocoder = [[[MKReverseGeocoder alloc]
initWithCoordinate:location.coordinate] autorelease];
reverseGeocoder.delegate = self;
[reverseGeocoder start];
//화면의 로딩 스피너 없애기.
[self.spinner stopAnimating];
}
//메모리 부족을 받았을때.
- (void)didReceiveMemoryWarning {
// Releases the view if it doesn't have a superview.
[super didReceiveMemoryWarning];
NSLog(@"branchmap memory warning.");
// Release any cached data, images, etc that aren't in use.
}
//뷰 내릴때.
- (void)viewDidUnload {
NSLog(@"branchmap viewDidUnload");
[self.locationManager stopUpdatingLocation];
self.locationManager = nil;
self.reverseGeocoder = nil;
self.mapView = nil;
self.searchType = nil;
self.lastScannedLocation = nil;
self.spinner = nil;
[super viewDidUnload];
}
//객체 내려갈때.
- (void)dealloc {
NSLog(@"branchmap dealloc");
//사용한 객체들 릴리즈.
[mapView release];
[reverseGeocoder release];
[locationManager release];
[searchType release];
[lastScannedLocation release];
[spinner release];
[super dealloc];
}
#pragma mark MKMapViewDelegate
NSString *tempTelNo; //어노테이션의 더보기에서 전화걸기를 누를때 임시로 전화번호를 저장할 변수.
//맵의 어노테이션 (마커) 표시.
-(MKAnnotationView *)mapView:(MKMapView *)mV viewForAnnotation:(id<MKAnnotation>)annotation{
if (annotation==self.mapView.userLocation){
[mV.userLocation setTitle:@"현재 위치"]; //현재위치 마커에 표시할타이틀.
return nil; //현재 위치 마커일경우 커스텀 마커를 사용하지 않는다.
}
//현재위치 마커가 아닐때에는 지점마커이다.
BranchMarker *mk = (BranchMarker *) annotation;
MKPinAnnotationView *dropPin = nil; //마커 준비
static NSString *reusePinID = @"branchPin"; //마커 객체를 재사용 하기위한 ID
//마커 초기화
dropPin = (MKPinAnnotationView *)[mapView
dequeueReusableAnnotationViewWithIdentifier:reusePinID];
if ( dropPin == nil ) dropPin = [[[MKPinAnnotationView alloc]
initWithAnnotation:annotation reuseIdentifier:reusePinID]autorelease];
//핀이 떨어지는 애니메이션
dropPin.animatesDrop = YES;
//마커 오른쪽에 (>) 모양 버튼 초기화.
UIButton *infoBtn = [UIButtonbuttonWithType:UIButtonTypeDetailDisclosure];
dropPin.userInteractionEnabled = TRUE;
dropPin.canShowCallout = YES;
dropPin.rightCalloutAccessoryView = infoBtn;
//마커 왼쪽에 표시할 지점,ATM 아이콘
NSString* markerImg = nil;
if ([mk.markerType isEqualToString:@"0"]){
markerImg = @"hana.png";
dropPin.pinColor = MKPinAnnotationColorGreen;
} else {
markerImg = @"atm.png";
dropPin.pinColor = MKPinAnnotationColorRed;
}
dropPin.leftCalloutAccessoryView = [[[UIImageView alloc]
initWithImage:[UIImage imageNamed:markerImg]] autorelease];
//마커 리턴
return dropPin;
}
//어노테이션의 더보기
-(void)mapView:(MKMapView *)mapView annotationView:(MKAnnotationView*)view
calloutAccessoryControlTapped:(UIControl *)control{
BranchMarker *mk = (BranchMarker *) view.annotation;
tempTelNo = nil;
//얼럿메세지 초기화
NSString *alertMessage = [mk.title stringByAppendingString:@"\n"];
if ([mk.bussBrAdr length] > 1) //주소
alertMessage = [[alertMessage stringByAppendingString:@"\n"]
stringByAppendingString:mk.bussBrAdr];
if ([mk.trscDrtm length] > 1) //ATM운영 시간
alertMessage = [[alertMessagestringByAppendingString:@"\nATM : "]
stringByAppendingString:mk.trscDrtm];
NSString* telTitle = nil; //전화걸기 버튼 타이틀.
if ([mk.bussBrTelNo length] > 1){ //전화번호
alertMessage = [[alertMessage stringByAppendingString:@"\n대표전화 : "]
stringByAppendingString:mk.bussBrTelNo];
telTitle = @"전화걸기";
}
tempTelNo = mk.bussBrTelNo;
//얼럿뷰 표시
UIAlertView *confirmDiag = [[UIAlertView alloc] initWithTitle:nil
message:alertMessage delegate:self cancelButtonTitle:@"닫기"
otherButtonTitles:telTitle, nil];
[confirmDiag show];
[confirmDiag release];
}
//어노테이션의 더보기 (얼럿뷰) 에서 버튼 클릭.
-(void)alertView:(UIAlertView *)alertView
clickedButtonAtIndex:(NSInteger)buttonIndex{
if (buttonIndex == 1){
NSLog(@"전화걸기 : %@",tempTelNo);
if (tempTelNo != nil){
[[UIApplication sharedApplication]
openURL:[NSURL URLWithString:[@"tel:"
stringByAppendingString:tempTelNo]]];
}
} else if (buttonIndex == 0) {
NSLog(@"닫기");
}
}
#pragma mark LocationManager
//위치가 변경되었을때 호출.
-(void)locationManager:(CLLocationManager *)manager
didUpdateToLocation:(CLLocation *)newLocation
fromLocation:(CLLocation *)oldLocation {
NSString *strInfo = [NSString
stringWithFormat:@"didUpdateToLocation: latitude = %f, longitude = %f",
newLocation.coordinate.latitude, newLocation.coordinate.longitude];
NSLog(@"%@",strInfo);
MKCoordinateRegion region; //레젼설정
region = MKCoordinateRegionMakeWithDistance(newLocation.coordinate,2000, 2000);
MKCoordinateRegion adjustedRegion = [mapViewregionThatFits:region];
[mapView setRegion:adjustedRegion animated:YES];
//마지막으로 검색된 위치를 다른곳에서 활용하기 위하여 설정.
self.lastScannedLocation = newLocation;
//한번 위치를 잡으면 로케이션 매니저 정지.
[self.locationManager stopUpdatingLocation];
[self getBranchDataWithLocation:self.lastScannedLocation]; //화면에마커찍기
}
//위치를 못가져왔을때 에러 호출.
-(void)locationManager:(CLLocationManager *)manager
didFailWithError:(NSError *)error{
NSLog(@"locationManager error!!!");
//위치를 못가져왔을땐 현재 지도에 표시된 지역기준으로 지점검색 들어간다~
[self setSearchTypeToBranch];
//에러 다이얼로그 표시.
UIAlertView *alert = [[UIAlertView alloc]initWithTitle:@"위치기반 지점찾기" message:@"현재위치를 검색할수 없습니다.\n설정 > 일반 > 위치서비스 가 활성화 되어있는지 확인해주세요.\n\n위치정보를 가져올수 없어도 하단의 아이콘을 통하여 현재 지도의\n영업점/ATM 위치는 검색하실수\n있습니다." delegate:nil cancelButtonTitle:nilotherButtonTitles:@"확인",nil];
[alert show];
[alert release];
}
#pragma mark reverseGeocoder
//역지오코더 검색되었을때 UILabel에 역지오코딩 내용 표시
-(void)reverseGeocoder:(MKReverseGeocoder *)geocoder
didFindPlacemark:(MKPlacemark *)placemark{
if (geoLabel != nil){
//혹시 몰라 한번 try로 싸줌.
@try {
NSString *geoString = @"";
//locality 서울특별시 subLocality 송파구 thoroughfare 신천동
//지역에 따라 특정 파라메터에 값이 없을 수 있음. nil체크 하여표시함.
if (placemark.locality != nil)
geoString = [[geoString
stringByAppendingString:placemark.locality]
stringByAppendingString:@" "];
if (placemark.subLocality != nil)
geoString = [[geoString
stringByAppendingString:placemark.subLocality]
stringByAppendingString:@"\n"];
if (placemark.thoroughfare != nil)
geoString = [geoString
stringByAppendingString:placemark.thoroughfare];
//아무 정보도 받아올수 없으면 나라이름이라도 표시.
if ([geoString length] < 1 && placemark.country !=nil)
geoString = placemark.country;
geoLabel.text = geoString; //UILabel에 표시
}
@catch (NSException * e) {
//오류 발생하면 UILabel 비워줌.
NSLog(@"reverse GeoCoding error : %@",e);
geoLabel.text = nil;
}
@finally {
}
}
}
//역지오코더 에러 발생시 그냥 로그.
-(void)reverseGeocoder:(MKReverseGeocoder *)geocoder
didFailWithError:(NSError *)error{
NSLog(@"MKReverseGeocoder has failed.");
}
@end
4. 데이터 받아오는 액션 준비하기.
지점 데이터는 HTTP통신으로 받아오게 된다.
예를 들어 http://111.11.11.11:8888/getBranch.do?a=123&b=456 이런식으로 URL을 호출하게 되면 서버에서 리턴값이 스트링으로 “S;10;테스트지점;02-123-4567;서울시 구로구 개봉동;....” 이런식으로 세미콜론(;) 으로 구분된 문자로 내려오게 된다.
그러면 프로그램에서 해당 스트링을 잘라서 객체에 잘 집어넣으면 된다.
이것은 컨덴트 서버와 규격을 맞추어 프로그래밍을 해야한다.
하나은행에서 쓰이는 지점정보 서버와의 통신은 대외비이므로 지도구현과 관계없는 부분은 생략하여 정리한다.
// BranchMapGetDataAction.h
// HTTP 통신으로 컨덴츠 서버에서 데이터를 받아서 어노테이션에 셋팅하는 액션
#import <Foundation/Foundation.h>
@interface BranchMapGetDataAction : NSObject{
NSString *searchType; //검색조건
NSString *reqLat; //요청 위도
NSString *reqLng; //요청 경도
NSString *reqRange; //요청 범위 (메타 m 단위)
}
@property (nonatomic,retain) NSString *searchType;
@property (nonatomic,retain) NSString *reqLat;
@property (nonatomic,retain) NSString *reqLng;
@property (nonatomic,retain) NSString *reqRange;
- (id)initWithSearchType:(NSString *)_searchType andReqLat:(NSString *)
_reqLat andReqLng:(NSString *)_reqLng andReqRange:(NSString*)
_reqRange; //초기화 메소드
- (NSMutableArray*)getData; //데이터를 가져오는 메소드
- (NSString*)generateGeoCode:(NSString*)str; //서버의 응답 스트링 지오코드에 콤마 붙이는 메소드.
@end
// BranchMapGetDataAction.m
#import "BranchMapGetDataAction.h"
#import "BranchMarker.h"
#import <MapKit/MapKit.h>
@implementation BranchMapGetDataAction
@synthesize searchType,reqLat,reqLng,reqRange;
//초기화 메소드.
- (id)initWithSearchType:(NSString *)_searchType
andReqLat:(NSString *)_reqLat andReqLng:(NSString *)_reqLng
andReqRange:(NSString*)_reqRange {
if ((self = [super init])) {
// Custom initialization
self.searchType = _searchType;
self.reqLat = _reqLat;
self.reqLng = _reqLng;
self.reqRange = _reqRange;
}
return self;
}
// 결과값 받아다가 어노테이션(마커) 배열로 리턴.
- (NSMutableArray *)getData{
//스테이더스 바에 로딩 표시. (데이터 가져오는 네트워크 상태 표시)
[UIApplication sharedApplication].networkActivityIndicatorVisible =YES;
//요청타입이 널탕이면 기본적으로 지점검색으로 셋팅.
if (self.searchType == nil || [self.searchTypeisEqualToString:@""]){
self.searchType = @"0";
}
//요청 URL
NSString *urlString = @"http://1.1.1.1/a/b.jsp?distance=";
urlString = [[urlString stringByAppendingString:self.reqRange]
stringByAppendingString:@"&map_x="];
urlString = [[urlString stringByAppendingString:self.reqLng]
stringByAppendingString:@"&map_y="];
urlString = [[urlString stringByAppendingString:self.reqLat]
stringByAppendingString:@"&svc_type="];
urlString = [urlString stringByAppendingString:self.searchType];
NSURL *url = [NSURL URLWithString:urlString];
NSLog(@"url : %@", urlString);
//리퀘스트 객체.
NSMutableURLRequest *request = [[[NSMutableURLRequest alloc]
initWithURL:url] autorelease];
//레스폰스 객체,에러 객체 준비.
NSURLResponse *response = nil;
NSError *error = nil;
//데이터 받아오기.
NSData* receiveData = [NSURLConnectionsendSynchronousRequest:request
returningResponse:&response error:&error];
//받아온 데이터 파싱.
NSString *str = [[NSString alloc] initWithData:receiveData
encoding:0x80000000 + kCFStringEncodingDOSKorean];
str = [str stringByReplacingPercentEscapesUsingEncoding:
0x80000000 + kCFStringEncodingDOSKorean];
//NSLog(@"DATA GETTED!!! : %@",str);
//에러가 발생하였으면 에러표시.
if(error != nil) {
NSLog(@"%@", [error localizedDescription]);
UIAlertView *alert = [UIAlertView alloc];
[alert initWithTitle:@"에러" message:[NSString
stringWithFormat:@"서버에 접속할 수 없습니다.\n%@",
[error localizedDescription]] delegate:self
cancelButtonTitle:@"확인" otherButtonTitles:nil];
[alert show];
[alert release];
}
//마커배열 준비.
//받아온 스트링을 세미콜론으로 잘라서 배열로 넣어버린다.
NSArray *branchArray = [str componentsSeparatedByString:@";"];
NSMutableArray *returnAry = [[NSMutableArray alloc] init]; //리턴할배열 준비.
NSLog(@"getted branch array size : %d",[branchArray count]);
@try {
//i=2 로 준것은 첫번째 배열엔 성공여부(S) 두번째 배열엔 받아온 지점 갯수 (int#) 이다.
안쓰이므로 무시하고 세번째 배열원소부터 사용하도록한다.
for (int i=2; i<([branchArray count]-1); i+=7) {
//마커 준비.
BranchMarker *marker = [[BranchMarker alloc] init];
//값 셋팅.
marker.bussBrNm = [branchArray objectAtIndex:i];
marker.bussBrTelNo = [branchArray objectAtIndex:i+1];
marker.bussBrAdr = [branchArray objectAtIndex:i+3];
marker.bussBrAdr2 = [branchArray objectAtIndex:i+2];
marker.trscDrtm = [branchArray objectAtIndex:i+4];
//마커에 위도,경도 정보 셋팅.
MKCoordinateRegion region = { {0.0, 0.0 }, { 0.0, 0.0} };
region.center.latitude = [[self generateGeoCode:
[branchArray objectAtIndex:i+6]] floatValue];
region.center.longitude = [[self generateGeoCode:
[branchArray objectAtIndex:i+5]] floatValue];
region.span.longitudeDelta = 0.01f;
region.span.latitudeDelta = 0.01f;
marker.coordinate = region.center; //셋팅!
//찾아오시는길은 값이 있을때에만 셋팅.
if ([ marker.bussBrAdr length] > 1)
marker.subtitle = marker.bussBrAdr;
marker.markerType = self.searchType; //마커 타입 (지점/ATM)
if ([self.searchType isEqualToString:@"0"]){
//지점이면 이름에다가 "지점" 이라는 글씨 추가로 셋팅.
marker.title = [marker.bussBrNm
stringByAppendingString:@" 지점"];
} else {
marker.title = marker.bussBrNm;
}
//배열에 추가.
[returnAry addObject:marker];
//마커 릴리즈.
[marker release];
}
}
@catch (NSException * e) {
//가끔 컨덴츠 서버에서 오류가 난 데이터를 내리는 경우가 있다.에러,보정처리는 알아서~
.....삭제.....
}
@finally {
}
//검색결과가 없을때 오류 표시.
if ([returnAry count] == 0){
NSString *errorTitle = nil;
NSString *errorMsg = @"\n\n네트워크 오류일수 있으니 다른지역으로 이동, 또는 지도를 확대하여\n검색하시거나 잠시 후 다시 시도해주세요.";
if ([self.searchType isEqualToString:@"0"]){
errorTitle = @"영업점 검색오류";
errorMsg = [[NSString stringWithString:
@"해당 지역에 '영업점' 검색결과가\n없습니다."]stringByAppendingString:errorMsg];
} else {
errorTitle = @"ATM 검색오류";
errorMsg = [[NSString stringWithString:
@"해당 지역에 'ATM' 검색결과가\n없습니다."]stringByAppendingString:errorMsg];
}
UIAlertView *alert = [[UIAlertViewalloc]initWithTitle:errorTitle
message:errorMsg delegate:nil
cancelButtonTitle:nil
otherButtonTitles:@"확인",nil];
[alert show];
[alert release];
}
//스테이더스바 로딩 끄기.
[UIApplication sharedApplication].networkActivityIndicatorVisible =NO;
//배열 리턴.
return returnAry;
}
// 위도 경도에 콤마 붙이기. ex(37123456 -> 37.123456)
-(NSString*)generateGeoCode:(NSString*)str {
if (str != nil && [str length] >= 8) {
int lastIdx = [str length];
int middIdx = lastIdx - 6;
NSString* s1 =[str substringWithRange:
NSMakeRange (0,middIdx)]; //콤마 앞의 스트링
NSString* s2 =[str substringWithRange:
NSMakeRange (middIdx,6)]; //콤마 뒤의 스트링
NSString *output = [[s1 stringByAppendingString:@"."]
stringByAppendingString:s2]; //콤마 붙여서 리턴
return output;
}
return nil;
}
@end
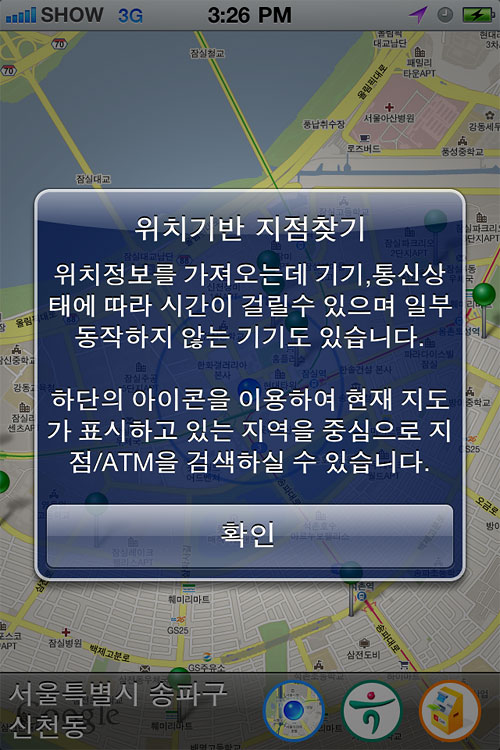
5. 실행 스크린샷.
최초 실행하면 나오는 안내문구.
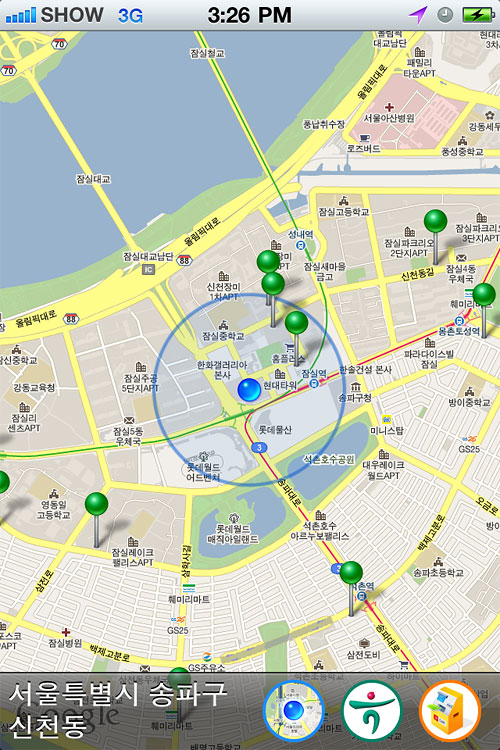
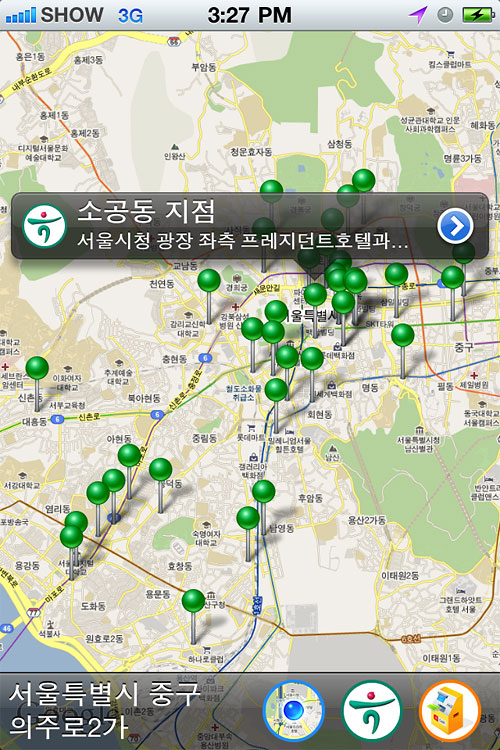
현재위치를 표시하며 현재위치 기준으로 영업점들을 찾아서 주루룩 찍어낸다.
현재위치 마커엔 title 로 "현재위치" 라고 셋팅 해 두었다.
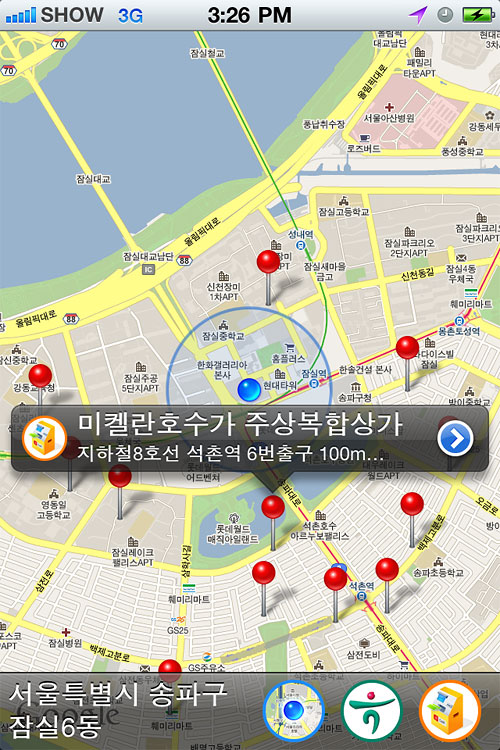
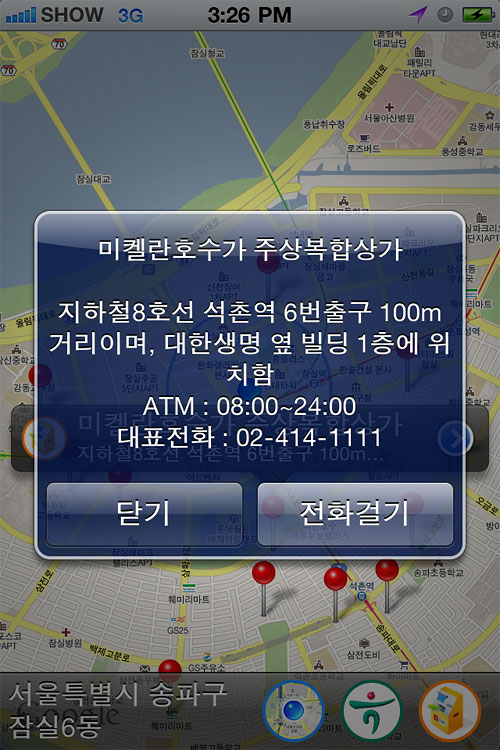
지점/ATM 마커를 누르면 간단한 정보가 나온다.
간단한 정보에서 오른쪽 버튼을 누르면 상세한 정보가 나온다.
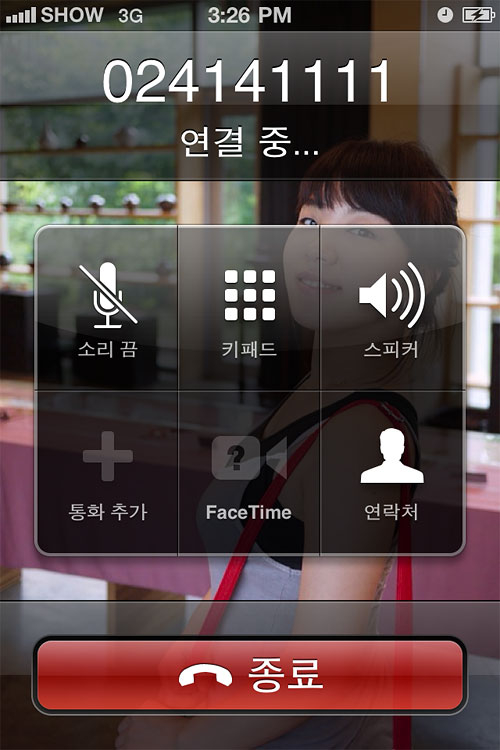
선택 지점/ATM으로 전화걸기
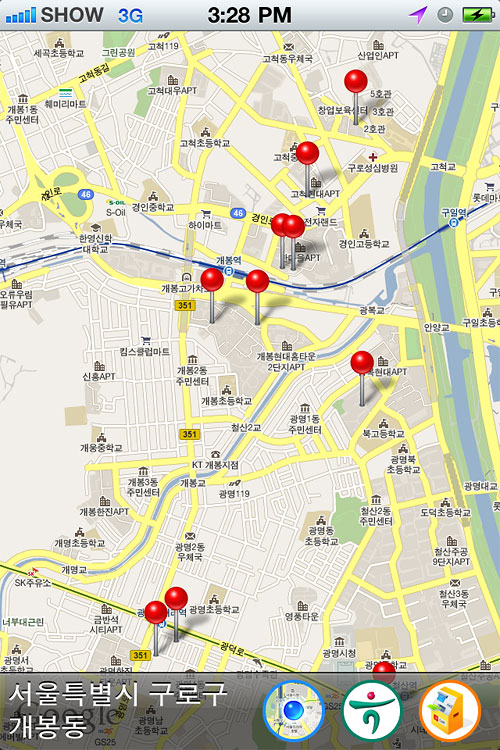
현위치 말고도 지도를 옮겨 원하는 지역에서 검색을 할 수도 있다.
원하는 지역으로 옮겨가서 하단의 지점/ATM 아이콘을 누르기만 하면 된다.
마지막으로 우리동네도 한번.
6. 해결하지 못한 부분
- MKMapview 의 지도화면에 특정 지점을 눌러서 뭔가 액션을 해주고 싶어 MKMapview를 상속하여 커스텀 맵뷰를 구현했는데 터치이벤트에서 오류 작렬! 그리고 줌인 줌아웃시에 오류가 난다.. ㅠ
- iOS 4부터는 스테이터스 바에 위치서비스 사용 아이콘이 나오는데 분명 LocationManager 를 stop 시켜주었는데도 아이콘이 계속 떠있다. Tweeter 어플등을 보면 현위치를 가져오고 난 뒤에는 아이콘이 사라지는것 같은데..
solution :
mapView.showsUserLocation = YES;
이 문제였다. 현위치가 필요하지 않을때 적당한 시점에서 NO 를 넣어주면 현재위치 가져오는것을 종료하고 스테이더스바에 위치서비스 아이콘이 없어지게 된다.
- 3G 네트워크 등. 인터넷 상태가 불안정할때 처리에 오래 걸리는 문제. 데이터를 받아오는 순간에 프로그램이 정지된것 처럼 보인다. iOS 도 스레드를 돌려서 백그라운드로 돌려야 하나? 이건 다음버전에서 고민.
- 이번 글은 보기좋게 PDF파일로 첨부합니다.
2010.11.17 모근원 (Geunwon,Mo)
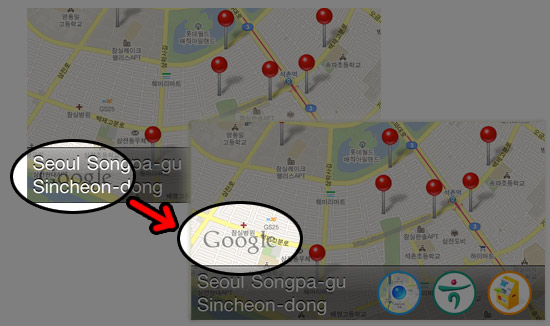
* 추가 TIP : Google 로고 옮기기.
현재 툴바로 구글로고를 가려지게 되어있는데 이게 앱스토어에 올라갈경우 리젝사유가 된다고 한다.
그래서 바로 구글링해서 구글로고 옮기는법을 찾았다.
먼저 MKMapView 에다가 메소드를 추가할것이니 카테고리로 구현하도록 한다.
나는 클래스를 추가하였다.
//
// BranchMapMKMapView.h
// BranchMap
//
// Created by Geunwon,Mo on 10. 11. 18..
// Copyright 2010 Lomohome.com. All rights reserved.
//
#import <MapKit/MapKit.h>
@interface MKMapView (Additions)
- (UIImageView*)googleLogo;
@end
//
// BranchMapMKMapView.m
// BranchMap
//
// Created by Geunwon,Mo on 10. 11. 18..
// Copyright 2010 Lomohome.com. All rights reserved.
//
#import "BranchMapMKMapView.h"
@implementation MKMapView (Additions)
- (UIImageView*)googleLogo {
UIImageView *imgView = nil;
for (UIView *subview in self.subviews) {
if ([subview isMemberOfClass:[UIImageView class]]) {
imgView = (UIImageView*)subview;
break;
}
}
return imgView;
}
@end
카테고리 추가후 지도를 구현하는 ViewController (여기서는 BranchMapViewController.m)에다가 카테고리로 추가한 메소드를 뷰가 나오기전에 실행해서 구글로고의 위치를 변경하도록 한다.
#import "BranchMapGetDataAction.h"
....생략.....
////////////// Custom MapView Category start ///////////////
float _toolBarPositionY = 0.0f; //<- 이놈은 viewDidLoad 안에서 값을 셋팅한다. 현재 화면 툴바의 Y좌표값.
- (void)viewDidAppear:(BOOL)animated {
NSLog(@"view did appear");
[self relocateGoogleLogo];
}
- (void)didRotateFromInterfaceOrientation:(UIInterfaceOrientation)fromInterfaceOrientation {
[self relocateGoogleLogo];
}
- (void)relocateGoogleLogo {
UIImageView *logo = [mapView googleLogo];
if (logo == nil)
return;
CGRect frame = logo.frame;
frame.origin.y = _toolBarPositionY - frame.size.height - frame.origin.x;
logo.frame = frame;
}
////////////// Custom MapView Category end ///////////////


 iOS의 MKMapView 정리하기.pdf